Configure
Application Instances.
ogamma Visual Logger for OPC is designed to allow running its multiple instances in the same or different machines, with ability to share most of configuration settings (such as settings to connect to time-series database) between instances.
When instance of the application starts first time, it generates unique identifier (GUID) for itself, and saves this identifier among with other settings in the configuration file with name composed by adding instance.json after main configuration file name. By default that will be ./data/config.json.instance.json.
Then instance identifier is used to create subfolder for log files and PKI folder. In fields defining log file name placeholder [InstanceId] can be used , at runtime it is replaced by actual instance identifier.

Configuration files.
Starting from version 0.8.1, all configuration settings can be changed via web GUI, which is accessible over port 4880 after application start. In order to make automated deployments possible, some small portion of configuration settings (web server settings, configuration database settings and log file settings) can be set in the main configuration file (default location at ./data/config.json, can be changed by passing file name as argument at startup). If folder ./data does not exist, it will be created. If configuration file in expected location cannot be found, then copy of original file config.json (which is located in the same folder where application executable binary is located.) is made.
Example of config.json file follows below:
{
  "server": {
    "ipAddress": "0.0.0.0",
    "port": 4880,
    "docRoot": "./public_html",
    "threads": 1
  },
  "configDb": {
    "type": "SQLite",
    "path": "./data/config.db"
  },
  "appLog": {
    "fileName": "./data/[InstanceId]/logs/app-log.txt",
    "level": 0
  },
  "sdk": {
    "ioThreads": 2,
    "timerThreads": 16,
    "callbackThreads": 16,
    "certificatesRootFolder": "./data/[InstanceId]/PKI",
    "log": {
      "fileName": "./data/[InstanceId]/logs/sdk-log.txt",
      "level": 0
    }
  },
  "timeSeriesDataBases": [
    {
      "id": 1,
      "type": "PostgreSQL",
      "displayName": "PostgreSQL database at localhost",
      "host": "localhost",
      "port": 5432,
      "dbName": "ogammalogger",
      "userName": "ogamma",
      "password": "ogamma",
      "initScript": "./init-db-postgres.sql",
      "connectionWaitTimeInSeconds": 15,
      "numberOfValuesInWriteBatch": 1000,
      "maxWriteInterval": 500
    }
  ]
}
Configuration fields in this file are self-explaining. Most important settings which might prevent normal start and running of the application are http web server settings (node server).
Node server / ipAddress allows http server (which serves Web GUI) to bind and listen on specific IP address. Default value 0.0.0.0 means to listen on all network cards. Specific address like 192.168.1.75 means to listen only on this address. Note that address value must be valid IP address, and host name as localhost is not allowed.
Node configDb sets options for configuration database. Its type can be either SQLite or PostgreSQL. For SQLite type database option path defines file name.
The rest of configuration settings are used only at the very first start. Afterwards they are stored in instance-specific configuration file, with name composed by adding instance.json to the main configuration file name.
Majority of other settings are stored in the configuration SQL database (SQLite or PostgreSQL).
In the configuration file (./data.config.json by default) optional node timeSeriesDataBases defines initial settings for time-series databases (TSDB). Currently type of TSDB can be either PostgreSQL or InfluxDb or Kafka or MS SQL or MySQL or SQLite. Future versions will support other types of databases too (see section Roadmap for more details). More detailed information on how to configure settings for TSDB can be found in section Time-Series Databases.
Note
The section timeSeriesDataBases is type of array, i.e. it can have settings for multiple connections to time-series databases. At the very first start of the application, the very first element of the array is used for the current instance. All elements of time-series database settings node are added to the configuration database, so they can be selected from the GUI later (via menu Setup/Instances).
Configuration steps.
Once application instance is started, by default it listens on http port 4880. Now you can open from web browser its configuration GUI at address http://localhost:4880)
Tip
Watch this quick start video demonstrating major deployment and configuration steps: https://youtu.be/QGZ3LrwR5ls?si=QJp_cKKblq6Ek5oW
There are few parts of configuration, which are described shortly below and in detail in the following sections:
Decide and setup what database to store configuration settings in. If you plan to run single independent instance, then SQLite is easy choice, as it does not require installation of additional database. But if multiple instances are planned, then it is recommended to choose PostgreSQL, because in this case some settings (for example built-in authentication provider’s user accounts) can be shared between instances. It might be also easier to make backups of the consifuration database with PostgreSQL.
User authentication and authorization.
Configure how to
Collectdata. Multiple sets of settings can be configured, each calledCollector Configuration.Configure how to
Storetime-series data, i.e. value/quality/timestamps for OPC UA variables. Multiple time-series database connection settings can be configured.Assign specific combination of settings for
Collector ConfigurationandTSDB Configurationto the application instance.
Note
Before starting configuration, perform activation according to section Activate.
Sections below provide details on each of these steps.
1. Connecting to the Configuration database.
Such configuration options as what OPC UA Servers to connect to, what variables log data for, and how to connect to time-series databases, as well as user accounts for the built-in identity provider are stored in SQL configuration database. This section describes how to set connection parameters for it.
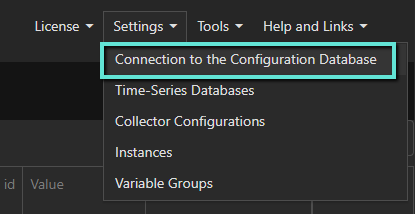
Open menu Settings/Connection to the Configuration Database (on the top right corner of the configuration web page):
In the opened dialog window select type of the database (SQLite or PostgreSQL) and other required settings. You can verify if settings are correct by clicking on the button TestConnection. In case if database is not ready yet to accept connections, but connection settings are already known, then they can be saved even if attempt to connect fiils, by un-checking of the flag Do Not Save If Invalid.

1.1 Connecting to PostgreSQL database in secured mode
At the lower level in order to communicate with configuration database of PostgreSQL type the ogamma Visual Logger for OPC uses library libpq. Option sslmode used in this library to fine tune SSL communication can be set in the field Other settings in the Configuration Database settings dialog window. In the same field it is also possible to set what database should be used at initial connection to the configuration database (at this stage if configuration database does not exist, it is created), by setting of the option defaultdb. Example value for the Other settings field is given below:
{
  "defaultdb": "postgres",
  "sslmode": "prefer"
}
Tip
If attempt to connect to the PostgreSQL database fails with error FATAL: database "postgres" does not exist, set name of the existing database in the defaultdb option.
Tip
If PostgreSQL server supports both secured and non-secured connection modes, in order to force non-secured mode (in troubleshooting purposes for example), set option sslmode to disable.
2. User authentication and authorization.
2.1. Versions before 4.0.0
Starting from version 0.9.0, in order to access configuration GUI, user authentication is required. In version 0.9.0 simple built-in identity provider is used for such authentication, which stores user accounts in the configuration database. This means that the application should be able to connect to the configuration database for user authentication to work. Therefore is it recommended to set valid configuration database connection options in the configuration file ./data/config.json, section configDb. If at application start-up configuration database is not accessible, then it will temporarily allow login, so configuration database settings can be changed via GUI. After switching configuration database to another one, existing sessions are closed, and users will need to login again using user accounts stored in that database.
When configuration web GUI is opened from browser, Login dialog windows pops up:
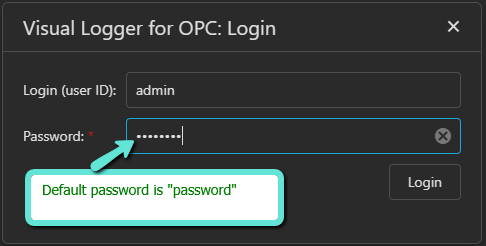
Tip
At the very first login, use default user name admin and password password. After login, change password using menu Account/Change Password.
Simple built-in identity provider supports following features:
Passwords are not stored in the database, instead, secure algorithm based on hashing is used to validate user credentials.
Note
To protect passwords during transfer from web browser to the backend, in production environment use secure
httpsprotocol. Settings up https is described in section How to setup configuration GUI endpoint to use https.User accounts can be managed via menu
Account/User Accounts. Opened dialog window displays list of current users, and allows to add, edit or delete user accounts. Default user accountadmincannot be deleted.User Account records have the following fields:
Login (User Id)- uniqie identifier;Full Name- descriptive name of the user;Role: defines what actions the user can be perform:admin- full access to all configuration settings, including managing of User Accounts;readWrite- full access to all configuration settings, excluding managing of User Accounts;readOnly- read only access to all configuration settings, excluding managing of User Accounts;
Active- - boolean flag, if ckecked (true), user account is active (enabled), otherwise - disabled.
Typical user management workflow is described below:
The administrator creates new user via menu
Account/User Accounts, assigning temporary password, and then provides Login and password to the user;The new user logs in to the application, and then changes his password using menu
Account/Change password.While the page is open in the browser, the session stays active as long as there is data transfer between browse and the application.
The session becomes un-authenticated after closing of the page, or Logout, or after in-activity longer than 15 minutes.
Note that automatic refreshing of real-time data values is counted as session activity too.
If administrator deletes user account or turns off its
Activefield, current session of the user immediately becomes expired, and he cannot access configuration settings anymore.If configuration GUI is opened from more than one windows or tab page in the browser, each will maintan separate session.
2.2. Versions 4.0.0 or newer.
In version 4.0.0 new feature to support Single Sign On (furhter below referred as SSO) was introduced. While support for built-in user authentication/authorization described in section 2.1 is still available, it is also possible to utilize JWT access token passed in the headers of http requests sent from frontend (browser) to the backend (configuration endpoint of the application). Note that in version 4.0.0 this feature requires oauth2 proxy service to pass this JWT token.
Note
The application version 4.0.0 was tested with open-source oauth2 proxy which is available here: https://github.com/oauth2-proxy/oauth2-proxy It was running integrated with popular web reverse proxy nginx: https://nginx.org/ and open-source user identity provider keycloak: https://www.keycloak.org/ All these 3 components are well maintained, supported, funded open source projects ready to be used in enterprise level production environment.
In the next versions support for authentication with JWT tokens without proxies will be added.
You can get more information about JWT (Java Web Tokens) at this web site: https://jwt.io/ It also provides online tool to parse JWT value and views it in human readable JSON format, so you can see there such fields as user name, roles assigned to him/her, etc.
The way how the users are authenticated and authorized is controlled by few new environment variables:
OVL_AUTH_TYPE- defines user authentication flow. Possible values are:BUILTIN- only built-in user authenticaiton/authorization method is used.JWT_BUILTIN- if http request has a header with name defined in another environment variableOVL_JWT_HEADER, then its value is interpreted as JWT token. If there is no such header, then built-in user authentication is used. This is default value.OVL_JWT_HEADER- name of the http header in which JWT token is passed by oauth2 proxy. Default value isX-Access-Token. The proxy must be configured to pass JWT in this header. The GUI cannot be accessed using built-in authenticaion.
OVL_JWT_ROLES_PATH- path in the JWT for JSON node with list of roles assigned to the user. Default value isrealm_access/roles. This is the default path used in user identity provider solutionkeycloak. To authorize the user to access application’s configuration GUI endpoint, the list of roles should contain one or more roles with names, defined by the following below environment variables. These roles should be created and assigned in the User Identity Provider (keycloak):OLV_JWT_ROLE_MAP_READrole to read configuration settings, default value isovl-read.OLV_JWT_ROLE_MAP_WRITE- role to change configuration settings. Default value isovl-write.OLV_JWT_ROLE_MAP_ADMIN- administrator role. Default value isovl-admin.
OVL_JWT_VERIFY- flag, defines, should the JWT token be verified. Possible values are:0- verification is disabled. Can be used when authentication proxy guarantees that only verified JWT tokens are pased and tokens are guaranteed to be deliviered to the application without tampering.1- verification is enabled (default value). In this case, couple of more settings should be configured, to provide public key required to validate signature passed in the JWT.OVL_JWT_KEY_URL- URL to the public key used to verify the token. Possible values are:iss- value of theissclaim in JWT token is used as URL to get the public key.value which can be interpreted as valid http URL (starts by
http) - this address is used to download the public key by GET http request call.otherwise - treated as path to the file where public key stored in PEM format.
Default value is
iss.
For more information on how to configure nginx, oauth2 proxy and keycloak, Docker files will be published at the product GitHub page, and YouTube videos will be posted soon.
3. Collector Configurations.
Collector Configurations define set of settings on what OPC UA Servers to connect to, and what variables to log data for and how often (i.e. sampling rate etc.).
ogamma Visual Logger for OPC is designed keeping in mind to add support for new features such as redundancy and scalability in the future. It is possible to view the same settings from multiple instances and assign them to one or more specific instances. This will allow for example to collect data for exactly the same set of variables from two different instances, but store them into different timeseries databases. In fact this type of setup will implement redundancy on storage side.
Collector Configurations table currently has just name attribute. List of Collector Configurations is available to edit via menu Settings/Collector Configurations. You can leave it as is.
For details on how to configure connections to OPC UA Servers and define set of variables to collect data for, please refer to section Collect.
4. Time-Series database connection settings.
Time-series database is where data values received from OPC UA Servers are stored. It can be either PostgreSQL/TimescaleDB, or InfluxDB, or Apache Kafka, or MS SQL Server, or MySQL, or SQLite.
It is possible to create multiple records of connection settings, and then assign those settings to specific instance of the application.
List of time-series database connection settings is available to edit via menu Settings/Time-Series Databases.

Dialog window Time-series database configuration settings will be opened.
First, select type of desired database:

Click button Reset to defaults in order to set default values for this type of database. To verify that settings are correct click on Test Connection button. After that settings can be saved.
In detail other time-series database settings are described in section Time-Series Databases.
5. Configuration of application instance.
Once Collector Configuration record is created and required time-series database configurations are created, one of each need to be assigned to the application instance.
Open Application instances dialog window by menu Settings/Instances. In the table there will be record for each instance using the same configuration database. The instance which the browser is connected to has home icon.

Click on Edit icon to view all settings and edit some of them. In the opend dialog window assign Coolector Configuration and Time-Series Database to the Instance.

When mouse hovers over right side of the dialog window, scrool bar appears. Using it, scrool down to view the rest of settings: log file settings and links to open Grafana and time-series database manager.
When Save button is clicked, changes are saved and applied without restart of the application (exception is log file settings: while log level is applied without restart, for other options restart is required in order to apply).
6. Configuration of the instances as High Availability Cluster Nodes.
2 separate instances of the application need to be installed. As of version 4.2.1 they both need independent licenses. In the future they might share the same license key. For now, for discounted licenses for the secondary node contact sales@onewayautomation.com.
Another requirement is to install and run High Availability Node Manager service in both instances. If Windows installer is used to deploy the application, High Availability Node Manager can be installed as Windows service if this component is selected.
High Availability Node Manager is a sinlge executable file application, named ha_node.exe in Windows and ha_node in Linux. It is included in the distribution package. All configuration settings to it are passed via environment variables:
Settings to connect to the PostgreSQL database used as a heartbeat messages exchange media:
HA_DB_HOSTNAME: host name or IP address where the database is running
HA_DB_PORT: port number
HA_DB_USER: user name
HA_DB_PASSWORD: password. Node that in the currnet version it is stored as plain text. In the future wil lbe stored in encrypted format.
HA_DB_NAME: database name
HA_DB_TABLENAME: name of the table wehere heartbeat records arw written.
Other settings:
HA_CLUSTER_ID: identifier of the cluster.
HA_NODE_ID: identifier of a node , unique witht scope of a cluster.
HA_PRIORITY: integer number. The node with highest priority number becomes active is more than one node is operating in normal mode.
HA_HEARTBET_INTERVAL: interval of sending heartbeats. Default value is 1000 ms.
HA_TIMEOUT_INTERVAL: timeout after which not updating of the heartbeat record for this node is considered as failure of the node and the standby node takes over and becomes active. Default value is 3000 ms.
HA_HEALTH_CHECK_URL: url to check application health. For ogamma Visual Logger for OPC default value is http://localhost:4880/health .
HA_MAX_HEALTH_CHECK_FAILURES: maximum number failed calls to the HA_HEALTH_CHECK_URL after which the applicatoi is considered as not running and other nodes takes over. Default value is 3.
HA_HEALTH_CHECK_INTERVAL: interval checking of application health. Default value is 3000.
In Windows essential settings are available to change in the installation wizard. For Linux as well as for Windows portable installatins they should be set in environment variables before starting of the application executable.
Interprocess communication between ogamma Visual Logger for OPC and the High Availability Node Manager service is done via filesystem. Therefore they both must run in the same work directory. When Windows installer it used to deploy them, it is done automatically.
Next requirement to run as High availability Cluster node is that the instances should use the same PostgreSQL database as configuration database, to facilitate sharing of the configurations. Choice of configuratio database is done using the menu command Settings / Connection to the Configuration Database. As a result, multiple instances of the application can share the same Collector Configuration and TSDB configuration settings.
Note that the PostgreSQL database in turn should also run in High Availability mode. How to setup it in this mode is outside of this document scope.
Configuration of the first instance (connections to OPC UA Servers and selection of variables to log, and settings to connect to the TSDB) can be done as for the regular instance.
To make the second instance as a cluster member node, all you need is to configure its Instance settings to use the same values in the Collector Configuration and TSDB Configuration fields. Both instances should have the option Collector Agent Enabled checked. When running in a cluster, only Active node will be collecting data although both have the option Collector Agent Enabled checked. The node which is in the Standby mode will not collect data, like when it runs as the configuration option Instance settings / Collector Agent Enabled is turned off.
The current mode of the instance (Active or Standby), as well as the cluster id and node id are displayed in the Statistics dialog window, as well as in the header of the configuration GUI.
To troubleshoot High Avialability feature issues, log files are written in the folder ./data/ha-logs, as well messages in the application console are logged.
For more detailed information about the feature and for support contact support@onewayautomation.com