Monitoring Idako Application Health with NetData

Getting started · monitoring

When you're collecting and logging critical industrial data, losing any of it usually isn't an option — which means you need to know, 24/7, that the application itself is running smoothly, and to find out immediately the moment something isn't. Idako 4.3.2 added exactly that: a comprehensive set of health metrics exposed through the /health endpoint in Prometheus format, the industry standard for monitoring — letting you plug in a monitoring agent to watch every component and get notified the instant something goes wrong.

This guide walks through wiring that endpoint into NetData: two of its built-in collectors read /health — one that works today with zero setup, another that unlocks per-component and per-server detail once you're on Idako 4.3.2 — and NetData's own alerting emails you the moment something breaks. Nothing new to run: if a NetData agent is already watching this host, this uses it as-is.

about 15 minutes Idako 4.3.2 or later, for full metrics a NetData agent already installed network access to your Idako instance's health port outbound email already working on the NetData host
1

Get the config files

Download the ready-to-copy config files and unzip them as a folder named idako-netdata — four small files that plug into a NetData install you already have, nothing built from scratch. Two are collector job files (where to look), two are matching alert rule files (what counts as a problem):

idako-netdata/ ├── README.md ├── go.d/ │ ├── httpcheck.conf │ └── prometheus.conf └── health.d/ ├── idako-httpcheck.conf └── idako-prometheus.conf
Two collectors, checking two different things. httpcheck (step 2) works against /health exactly as it is today, on any Idako version, and is what reliably catches the instance being completely unreachable. The prometheus collector (step 3) needs Idako 4.3.2's /health?format=prometheus and unlocks per-component status and per-server detail. Run both side by side — one isn't a replacement for the other.
2

Point httpcheck at Idako

Open go.d/httpcheck.conf — it polls /health with a plain HTTP request and checks for a 200 response containing "status":"OK". The only thing to adjust is the target address:

go.d/httpcheck.conf
update_every: 5

jobs:
  - name: idako_local
    url: http://idako-host:4880/health
    status_accepted: [200]
    response_match: '"status"\s*:\s*"OK"'
    timeout: 3

Replace idako-host and 4880 with your Idako instance's actual host and port. The job's name matters too: it becomes the chart family NetData groups this check under, and it's what the alert rules in step 4 match against by the idako_ prefix — keep that prefix if you rename it.

3

Add richer metrics via Prometheus

Idako 4.3.2 also exposes /health in Prometheus's own text format, via a query parameter — the same format the Idako + Grafana guide reads with a dedicated Prometheus server, read here instead by NetData's own prometheus collector. Where httpcheck only tells you up or down, this charts every subsystem individually: the OPC UA collector engine, the local buffer, the tsdb connection, and each configured server by name.

go.d/prometheus.conf
update_every: 10

jobs:
  - name: idako_local
    url: http://idako-host:4880/health?format=prometheus
    app: idako
    expected_prefix: idako_
    max_time_series: 500

Same host/port substitution as step 2. app: idako groups the resulting charts under a predictable name in the dashboard; expected_prefix is a guard rail against accidentally scraping something that isn't Idako.

Confirm the exact chart names once, after step 6. NetData derives each chart's internal name from the metric name and this app: setting. The alert rules in the next step already use the documented pattern (prometheus.idako.<metric>), but it's worth a one-time check once data is flowing: curl -s http://localhost:19999/api/v1/contexts | grep idako.
4

Install the alert rules

Two files, one per collector from steps 2–3, written as templates — a template attaches to every matching chart automatically, so adding a second Idako instance later (see "Monitoring more than one instance") needs no changes here.

Reachability — pairs with httpcheck

health.d/idako-httpcheck.conf
template: idako_health_unreachable
      on: httpcheck.status
 families: idako_*
   lookup: average -1m unaligned percentage of success
    units: %
    every: 10s
     warn: $this < 100
     crit: $this < 50
    delay: down 30s multiplier 1.5 max 2m
     info: percentage of /health checks that succeeded (HTTP 200 + status:OK) in the last minute
       to: sysadmin

template: idako_health_response_slow
      on: httpcheck.response_time
 families: idako_*
   lookup: average -1m unaligned
    units: ms
    every: 10s
     warn: $this > 2000
     crit: $this > 5000
    delay: down 1m multiplier 1.5 max 5m
     info: average response time of Idako's /health endpoint over the last minute
       to: sysadmin

families: idako_* scopes both templates to job names starting with idako_, so they won't fire on unrelated httpcheck jobs running on the same agent.

Component health — pairs with the Prometheus collector

health.d/idako-prometheus.conf
template: idako_up_prom
      on: prometheus.idako.idako_up
   lookup: average -2m unaligned
    units: ratio
    every: 10s
     warn: $this < 1
     crit: $this == 0
    delay: down 30s multiplier 1.5 max 2m
     info: Idako reports overall status OK
       to: sysadmin

template: idako_collector_up_prom
      on: prometheus.idako.idako_collector_up
   lookup: average -1m unaligned
    units: ratio
    every: 15s
     warn: $this < 1
    delay: down 30s multiplier 1.5 max 2m
     info: Idako's OPC UA collector engine is not running
       to: sysadmin

template: idako_collector_disconnected_servers_prom
      on: prometheus.idako.idako_collector_disconnected_servers
   lookup: min -1m unaligned
    units: servers
    every: 30s
     warn: $this > 0
    delay: down 30s multiplier 1.5 max 2m
     info: one or more configured, active OPC UA servers are disconnected
       to: sysadmin

template: idako_collector_server_down_prom
      on: prometheus.idako.idako_collector_server_up
   lookup: min -1m unaligned foreach *
    units: ratio
    every: 30s
     warn: $this < 1
    delay: down 30s multiplier 1.5 max 2m
     info: this OPC UA server connection is not OK
       to: sysadmin

template: idako_collector_bad_variables_prom
      on: prometheus.idako.idako_collector_bad_variables
   lookup: average -1m unaligned
    units: variables
    every: 30s
     warn: $this > 0
     crit: $this > 100
    delay: down 1m multiplier 1.5 max 5m
     info: variables reporting bad quality, summed across the whole fleet
       to: sysadmin

template: idako_buffer_up_prom
      on: prometheus.idako.idako_buffer_up
   lookup: average -1m unaligned
    units: ratio
    every: 15s
     warn: $this < 1
    delay: down 30s multiplier 1.5 max 2m
     info: Idako's local buffer subsystem is not running
       to: sysadmin

template: idako_buffer_values_lost_prom
      on: prometheus.idako.idako_buffer_values_lost
   lookup: sum -5m unaligned incremental
    units: values
    every: 1m
     warn: $this > 0
    delay: down 1m multiplier 1.5 max 5m
     info: values could not be stored in the local buffer and were lost in the last 5 minutes
       to: sysadmin

template: idako_tsdb_down_prom
      on: prometheus.idako.idako_tsdb_up
   lookup: average -1m unaligned
    units: ratio
    every: 15s
     warn: $this < 1
    delay: down 30s multiplier 1.5 max 2m
     info: Idako's connection to the time-series database is not OK
       to: sysadmin

template: idako_tsdb_batches_failed_prom
      on: prometheus.idako.idako_tsdb_batches_failed
   lookup: sum -5m unaligned incremental
    units: batches
    every: 1m
     warn: $this > 0
    delay: down 1m multiplier 1.5 max 5m
     info: batches of values failed to forward to the tsdb in the last 5 minutes
       to: sysadmin
RuleFires whenSeverity
Idako unreachablehttpcheck stops getting HTTP 200 + status:OKwarning → critical
/health responding slowlyaverage response time > 2s (warn) / 5s (crit)warning / critical
Idako reports not OKidako_up is 0critical
Collector engine downidako_collector_up is 0warning
OPC UA server disconnectedidako_collector_server_up is 0 — one alert per serverwarning
Bad variables detectedidako_collector_bad_variables > 0 (warn) / > 100 (crit)warning / critical
Local buffer downidako_buffer_up is 0warning
Values lostidako_buffer_values_lost > 0 in the last 5mwarning
TSDB downidako_tsdb_up is 0warning
TSDB batch failuresidako_tsdb_batches_failed > 0 in the last 5mwarning
Why two separate "is it there" checks? httpcheck.status always writes a real 0 the moment a request fails outright — connection refused, timeout, wrong status code. idako_up_prom only evaluates once NetData has parsed a fresh Prometheus scrape; if the /health call fails completely, there's no idako_up sample to evaluate at all — a gap, not a 0 — and NetData's alarm engine doesn't reliably treat a gap as a failure. Keep both rules active: idako_health_unreachable catches "completely gone," idako_up_prom catches "up, but internally unhealthy."
5

Set the alert recipient

Every rule above ends in to: sysadmin — that's a role, not an address. NetData maps roles to real recipients in one file that (like Grafana's SMTP settings) isn't part of what you downloaded, since it holds where alerts actually go rather than what counts as a problem:

shell — Linux
cd /etc/netdata
sudo ./edit-config health_alarm_notify.conf

Set (or confirm) these values:

health_alarm_notify.conf
SEND_EMAIL="YES"
EMAIL_SENDER="alerts@example.com"
DEFAULT_RECIPIENT_EMAIL="you@example.com"

DEFAULT_RECIPIENT_EMAIL is where every to: sysadmin alarm above goes, since sysadmin is NetData's built-in default role. To send Idako's alerts to a different address than everything else on this host, set role_recipients_email[sysadmin]="you@example.com" instead — it overrides the default for just that one role.

Needs a working mail transport on this host. health_alarm_notify.conf hands the message to the system's own sendmail-compatible command to actually deliver it. If this host doesn't already send outbound mail, point it at a relay or install a local MTA first — that's a host-level prerequisite this file can't provide on its own.
On Windows, the same file lives at C:\Program Files\Netdata\etc\netdata\health_alarm_notify.conf — edit it from the bundled MSYS2 shell (C:\Program Files\Netdata\msys2.exe) as Administrator, since edit-config is a bash script and Program Files needs elevation to write to.
6

Turn it on

Three mechanical steps: confirm both collectors are enabled, copy the four files from step 1 into NetData's live config directory, and restart.

Enable the collectors

Both ship with default_run: yes, so this is usually a check, not a change:

shell — Linux
cd /etc/netdata
sudo ./edit-config go.d.conf
# confirm under modules:
#   httpcheck: yes
#   prometheus: yes
On Windows, run the equivalent from the bundled MSYS2 shell as Administrator: cd /etc/netdata && ./edit-config go.d.conf.

Copy the files in

shell — Linux
sudo cp go.d/httpcheck.conf     /etc/netdata/go.d/
sudo cp go.d/prometheus.conf    /etc/netdata/go.d/
sudo cp health.d/idako-httpcheck.conf   /etc/netdata/health.d/
sudo cp health.d/idako-prometheus.conf  /etc/netdata/health.d/
On Windows (PowerShell, as Administrator), Copy-Item the same four files into C:\Program Files\Netdata\etc\netdata\go.d\ and ...\health.d\ respectively.

Restart

shell — Linux
sudo systemctl restart netdata
On Windows, Restart-Service Netdata from an elevated PowerShell (or Services → Netdata → Restart).
7

Confirm it's working

Open http://localhost:19999 (or your NetData host's address) — NetData's own dashboard, no separate login to set up.

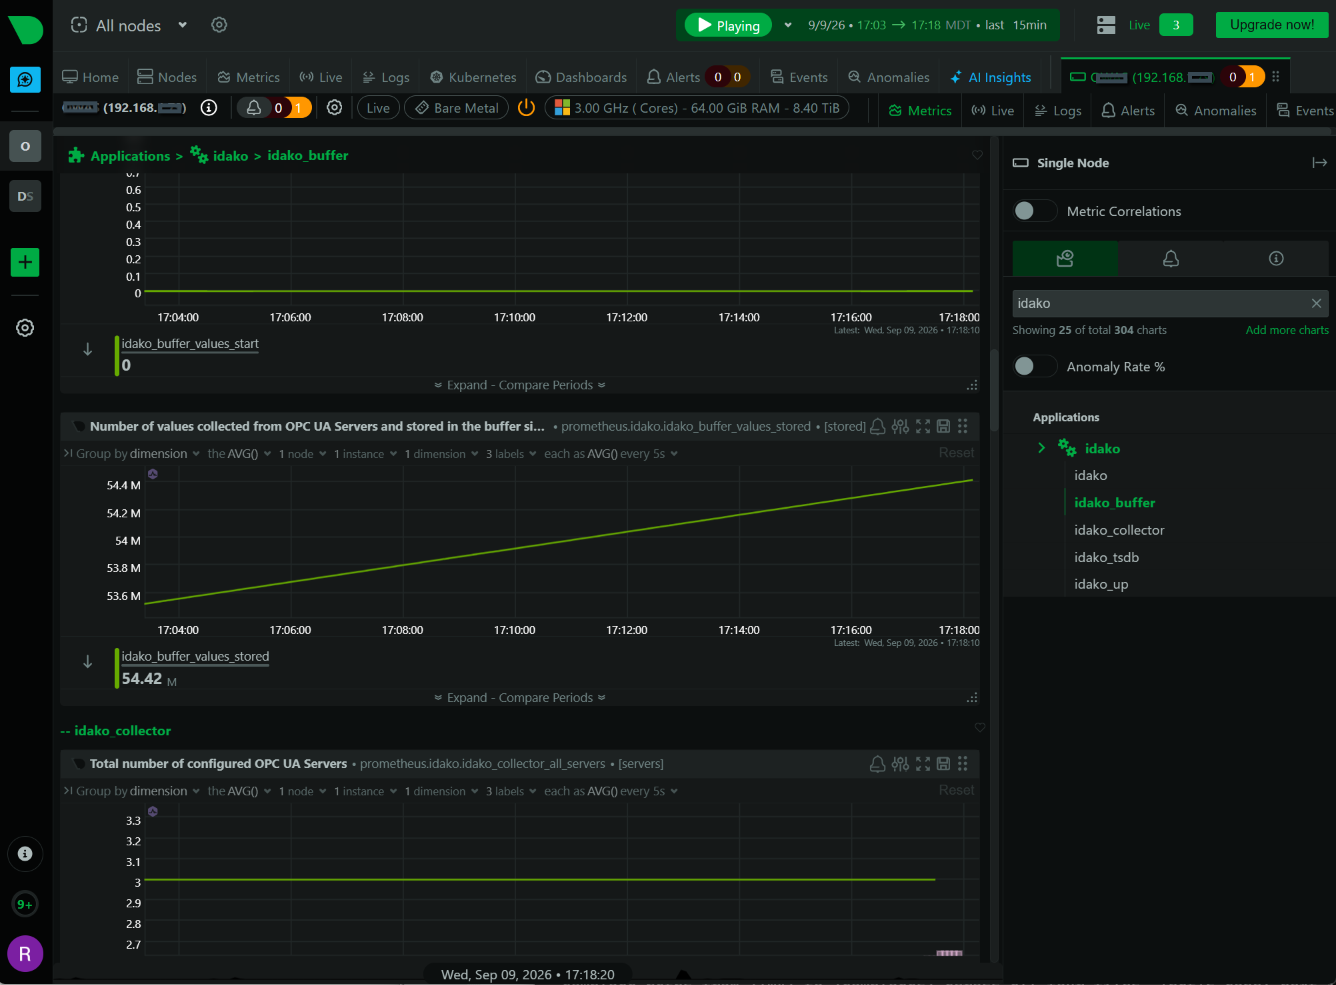
Look for an idako section in the left-hand menu. httpcheck's status and response-time charts should appear within a few seconds of restarting; the Prometheus-collector charts (per-component status, per-server detail) appear once step 3's job has scraped at least once. It should look something like this:

The idako section of NetData's dashboard: httpcheck status and response-time charts alongside per-component status for the collector engine, local buffer, and tsdb, plus a connection chart per configured OPC UA server.
NetData's idako section, running against a healthy instance.
You should see charts for httpcheck status and response time, plus — once the prometheus collector has run — separate status charts for the collector engine, local buffer, and tsdb, and one per configured OPC UA server. If the prometheus charts are missing, re-check the target directly with curl -s http://idako-host:4880/health?format=prometheus and revisit the one-time context-name check from step 3.
Beyond one instance

Monitoring more than one Idako instance

Add one more job to each collector file — nothing else changes, since every alert rule from step 4 is a template (or already scoped with families: idako_*) that automatically covers every matching job:

go.d/httpcheck.conf (excerpt)
  - name: idako_site_b
    url: https://idako-site-b.example.com/health
    status_accepted: [200]
    response_match: '"status"\s*:\s*"OK"'
    timeout: 3
go.d/prometheus.conf (excerpt)
  - name: idako_site_b
    url: https://idako-site-b.example.com/health?format=prometheus
    app: idako
    expected_prefix: idako_
    max_time_series: 500

Restart NetData to pick up the new jobs — unlike a health.d-only change, adding a job needs a full restart, not just reload-health.

Before you trust it

Verifying the alerts actually work

A clean restart only proves NetData accepted the config, not that a real notification gets delivered. Two checks worth doing once, right after setup:

  • Send a test notification — NetData ships a self-test for exactly this: sudo /usr/libexec/netdata/plugins.d/alarm-notify.sh test sends a real test message through every configured method, sysadmin included. Confirms step 5's settings actually deliver, before any real alarm depends on them.
  • Trigger a real one — stop Idako (or block the port) and wait a minute or two. idako_health_unreachable should move to warning, then critical, and an email should follow shortly after. Bring Idako back and you should get a second, "recovered" notification once it clears.
Notifications not arriving? Start with the self-test above, not the health.d files — if alarm-notify.sh test doesn't deliver either, it's a mail-transport problem on this host, not a config problem with the rules themselves.
Next steps

Where to go from here

Want fuller dashboards and PromQL-based alerting?The Idako + Grafana guide reads this same /health?format=prometheus endpoint with a dedicated Prometheus server and a Grafana dashboard — heavier to run, more powerful to query.
Detailed charts before every instance is on 4.3.2NetData's pandas collector can read the plain JSON /health body as a bridge — Linux-only in practice; confirm python.d.plugin and a Python 3 + pandas/requests environment before relying on it.
Route alerts to more than emailhealth_alarm_notify.conf supports Slack, PagerDuty, and a long list of other methods alongside email — same to: sysadmin roles, more delivery options per role.
See exactly what Idako reportsThe full field-by-field reference for /health, including every metric this guide's charts and alerts are built from.
This talks to Idako over plain HTTP on its health port — no credentials, and nothing new to install if a NetData agent is already watching this host.

Monitoring Idako Application Health with Grafana

Getting started · monitoring

When you're collecting and logging critical industrial data, losing any of it usually isn't an option — which means you need to know, 24/7, that the application itself is running smoothly, and to find out immediately the moment something isn't. Idako 4.3.2 added exactly that: a comprehensive set of health metrics exposed through the /health endpoint in Prometheus format, the industry standard for monitoring — letting you plug in a tool like Grafana to watch every component and get notified the instant something goes wrong.

This guide walks through a self-hosted monitoring stack you run in Docker: Prometheus scrapes that health data, Grafana turns it into a live dashboard — and emails you the moment something breaks. No cloud account, no agents to install on the Idako host itself.

about 25 minutes Idako 4.3.2 or later Docker & Docker Compose network access to your Idako instance's health port an SMTP relay, for email alerts
1

Get the project folder

Download the complete configuration and unzip it as a folder named idako-monitoring — everything below lives in that one folder, so the whole stack can be started, stopped, and moved as a unit. You'll adjust a handful of values inside it (your Idako host/port, SMTP details, alert recipient) over the next few steps; nothing needs to be built from scratch. Here's what's inside:

idako-monitoring/ ├── docker-compose.yml ├── .env-example ├── .gitignore ├── prometheus/ │ └── prometheus.yml └── grafana/ └── provisioning/ ├── datasources/ │ └── prometheus.yml ├── dashboards/ │ ├── dashboards.yml │ └── idako-overview.json └── alerting/ ├── contactpoints.yaml ├── policies.yaml └── rules.yaml
Note the missing .env. That file holds your real SMTP password and isn't included in the download — step 4 has you create it yourself from .env-example, and .gitignore (also from step 4) keeps it out of version control.
2

Point Prometheus at Idako

Open prometheus/prometheus.yml — it tells Prometheus what to scrape and how often, requesting Idako's health data in Prometheus format via a query parameter. The only thing to adjust is the target address:

prometheus/prometheus.yml
global:
  scrape_interval: 15s

scrape_configs:
  - job_name: idako
    metrics_path: /health
    params:
      format: [prometheus]
    static_configs:
      - targets: ["idako-host:4880"]

Replace idako-host and 4880 in targets with your Idako instance's actual host and port — that's the only edit this file needs.

Running Idako on the same machine as Docker? On Linux, use host.docker.internal only if your Docker version maps it (add extra_hosts: ["host.docker.internal:host-gateway"] under the prometheus service in step 5 if needed) — on Docker Desktop for Windows/Mac it works out of the box.
3

Provision the Grafana dashboard

Instead of clicking through Grafana's UI to add a data source and build panels by hand, three files already sitting in grafana/provisioning/ do it automatically, the same way every time you start the stack. Here's what each one does — none of them need editing.

Connects Grafana to Prometheus

grafana/provisioning/datasources/prometheus.yml
apiVersion: 1

datasources:
  - name: Prometheus
    uid: prometheus
    type: prometheus
    access: proxy
    url: http://prometheus:9090
    isDefault: true

http://prometheus:9090 works because Docker Compose puts both containers on the same network and lets them reach each other by service name — there's nothing to substitute here. The explicit uid: prometheus matters more than it looks: the dashboard panels below and the alert rules in step 4 both reference the datasource by this exact id, so pinning it here keeps everything pointed at the same place, rather than relying on whatever id Grafana would otherwise generate on its own.

Tells Grafana where to find dashboards

grafana/provisioning/dashboards/dashboards.yml
apiVersion: 1

providers:
  - name: Idako
    folder: Idako
    type: file
    updateIntervalSeconds: 30
    options:
      path: /etc/grafana/provisioning/dashboards

The dashboard itself

grafana/provisioning/dashboards/idako-overview.json — eleven panels covering every subsystem: instance, collector, local buffer, and tsdb status; connected/disconnected server counts; buffer backlog; tsdb batch failures; the buffer pipeline (collected/forwarded/balance); collection & forwarding rate; and variable quality (total/good/bad). Nothing to change here either, unless you want to customize it later:

grafana/provisioning/dashboards/idako-overview.json
{
  "title": "Idako Overview",
  "uid": "idako-overview",
  "schemaVersion": 39,
  "version": 4,
  "editable": true,
  "timezone": "browser",
  "time": { "from": "now-6h", "to": "now" },
  "refresh": "5s",
  "panels": [
    {
      "title": "Instance Status",
      "type": "stat",
      "gridPos": { "x": 0, "y": 0, "w": 4, "h": 6 },
      "datasource": { "type": "prometheus", "uid": "prometheus" },
      "targets": [{ "expr": "up{job=\"idako\"}", "refId": "A" }],
      "fieldConfig": {
        "defaults": {
          "mappings": [{ "type": "value", "options": {
            "0": { "text": "DOWN", "color": "red" },
            "1": { "text": "OK", "color": "green" }
          }}],
          "thresholds": { "mode": "absolute", "steps": [
            { "color": "red", "value": null }, { "color": "green", "value": 1 }
          ]}
        }, "overrides": []
      },
      "options": { "reduceOptions": { "calcs": ["lastNotNull"] }, "colorMode": "background", "graphMode": "none" }
    },
    {
      "title": "Collector Status",
      "type": "stat",
      "gridPos": { "x": 4, "y": 0, "w": 4, "h": 6 },
      "datasource": { "type": "prometheus", "uid": "prometheus" },
      "targets": [{ "expr": "idako_collector_up", "refId": "A" }],
      "fieldConfig": {
        "defaults": {
          "mappings": [{ "type": "value", "options": {
            "0": { "text": "DOWN", "color": "red" },
            "1": { "text": "OK", "color": "green" }
          }}],
          "thresholds": { "mode": "absolute", "steps": [
            { "color": "red", "value": null }, { "color": "green", "value": 1 }
          ]}
        }, "overrides": []
      },
      "options": { "reduceOptions": { "calcs": ["lastNotNull"] }, "colorMode": "background", "graphMode": "none" }
    },
    {
      "title": "Local Buffer Status",
      "type": "stat",
      "gridPos": { "x": 8, "y": 0, "w": 4, "h": 6 },
      "datasource": { "type": "prometheus", "uid": "prometheus" },
      "targets": [{ "expr": "idako_buffer_up", "refId": "A" }],
      "fieldConfig": {
        "defaults": {
          "mappings": [{ "type": "value", "options": {
            "0": { "text": "DOWN", "color": "red" },
            "1": { "text": "OK", "color": "green" }
          }}],
          "thresholds": { "mode": "absolute", "steps": [
            { "color": "red", "value": null }, { "color": "green", "value": 1 }
          ]}
        }, "overrides": []
      },
      "options": { "reduceOptions": { "calcs": ["lastNotNull"] }, "colorMode": "background", "graphMode": "none" }
    },
    {
      "title": "TSDB Status",
      "type": "stat",
      "gridPos": { "x": 12, "y": 0, "w": 4, "h": 6 },
      "datasource": { "type": "prometheus", "uid": "prometheus" },
      "targets": [{ "expr": "idako_tsdb_up", "refId": "A" }],
      "fieldConfig": {
        "defaults": {
          "mappings": [{ "type": "value", "options": {
            "0": { "text": "DOWN", "color": "red" },
            "1": { "text": "OK", "color": "green" }
          }}],
          "thresholds": { "mode": "absolute", "steps": [
            { "color": "red", "value": null }, { "color": "green", "value": 1 }
          ]}
        }, "overrides": []
      },
      "options": { "reduceOptions": { "calcs": ["lastNotNull"] }, "colorMode": "background", "graphMode": "none" }
    },
    {
      "title": "Connected Servers",
      "type": "stat",
      "gridPos": { "x": 16, "y": 0, "w": 4, "h": 6 },
      "datasource": { "type": "prometheus", "uid": "prometheus" },
      "targets": [{ "expr": "idako_collector_connected_servers", "refId": "A" }],
      "fieldConfig": { "defaults": { "color": { "mode": "thresholds" },
        "thresholds": { "mode": "absolute", "steps": [{ "color": "blue", "value": null }] } }, "overrides": [] },
      "options": { "reduceOptions": { "calcs": ["lastNotNull"] }, "graphMode": "none" }
    },
    {
      "title": "Disconnected Servers",
      "type": "stat",
      "gridPos": { "x": 20, "y": 0, "w": 4, "h": 6 },
      "datasource": { "type": "prometheus", "uid": "prometheus" },
      "targets": [{ "expr": "idako_collector_disconnected_servers", "refId": "A" }],
      "fieldConfig": { "defaults": { "color": { "mode": "thresholds" },
        "thresholds": { "mode": "absolute", "steps": [
          { "color": "green", "value": null }, { "color": "red", "value": 1 }
        ]} }, "overrides": [] },
      "options": { "reduceOptions": { "calcs": ["lastNotNull"] }, "graphMode": "none" }
    },
    {
      "title": "Buffer Backlog (values waiting to forward)",
      "type": "timeseries",
      "gridPos": { "x": 0, "y": 6, "w": 12, "h": 8 },
      "datasource": { "type": "prometheus", "uid": "prometheus" },
      "targets": [{ "expr": "idako_buffer_values_balance", "refId": "A" }],
      "fieldConfig": { "defaults": { "custom": { "drawStyle": "line", "lineWidth": 2, "fillOpacity": 15 },
        "color": { "mode": "palette-classic" } }, "overrides": [] },
      "options": { "legend": { "displayMode": "list", "placement": "bottom" }, "tooltip": { "mode": "single" } }
    },
    {
      "title": "TSDB Batch Failures (cumulative)",
      "type": "timeseries",
      "gridPos": { "x": 12, "y": 6, "w": 12, "h": 8 },
      "datasource": { "type": "prometheus", "uid": "prometheus" },
      "targets": [{ "expr": "idako_tsdb_batches_failed", "refId": "A" }],
      "fieldConfig": { "defaults": { "custom": { "drawStyle": "line", "lineWidth": 2, "fillOpacity": 15 },
        "color": { "fixedColor": "red", "mode": "fixed" } }, "overrides": [] },
      "options": { "legend": { "displayMode": "list", "placement": "bottom" }, "tooltip": { "mode": "single" } }
    },
    {
      "title": "Buffer Pipeline (collected / forwarded / balance)",
      "type": "timeseries",
      "gridPos": { "x": 0, "y": 14, "w": 8, "h": 8 },
      "datasource": { "type": "prometheus", "uid": "prometheus" },
      "targets": [
        { "expr": "idako_buffer_values_stored", "legendFormat": "Collected", "refId": "A" },
        { "expr": "idako_buffer_values_forwarded", "legendFormat": "Forwarded", "refId": "B" },
        { "expr": "idako_buffer_values_balance", "legendFormat": "Balance", "refId": "C" }
      ],
      "fieldConfig": {
        "defaults": { "custom": { "drawStyle": "line", "lineWidth": 2, "fillOpacity": 10 },
          "color": { "mode": "palette-classic" } },
        "overrides": [
          { "matcher": { "id": "byName", "options": "Balance" },
            "properties": [{ "id": "color", "value": { "mode": "fixed", "fixedColor": "orange" } }] }
        ]
      },
      "options": { "legend": { "displayMode": "list", "placement": "bottom" }, "tooltip": { "mode": "multi" } }
    },
    {
      "title": "Collection & Forwarding Rate (values/sec)",
      "type": "timeseries",
      "gridPos": { "x": 8, "y": 14, "w": 8, "h": 8 },
      "datasource": { "type": "prometheus", "uid": "prometheus" },
      "targets": [
        { "expr": "idako_collector_rate", "legendFormat": "Collection rate", "refId": "A" },
        { "expr": "idako_tsdb_values_forwarded_rate", "legendFormat": "Forwarding rate", "refId": "B" }
      ],
      "fieldConfig": { "defaults": { "custom": { "drawStyle": "line", "lineWidth": 2, "fillOpacity": 10 },
        "color": { "mode": "palette-classic" }, "unit": "reqps" }, "overrides": [] },
      "options": { "legend": { "displayMode": "list", "placement": "bottom" }, "tooltip": { "mode": "multi" } }
    },
    {
      "title": "Variables by Quality (total / good / bad)",
      "type": "timeseries",
      "gridPos": { "x": 16, "y": 14, "w": 8, "h": 8 },
      "datasource": { "type": "prometheus", "uid": "prometheus" },
      "targets": [
        { "expr": "idako_collector_all_variables", "legendFormat": "Total", "refId": "A" },
        { "expr": "idako_collector_good_variables", "legendFormat": "Good", "refId": "B" },
        { "expr": "idako_collector_bad_variables", "legendFormat": "Bad", "refId": "C" }
      ],
      "fieldConfig": {
        "defaults": { "custom": { "drawStyle": "line", "lineWidth": 2, "fillOpacity": 10 },
          "color": { "mode": "palette-classic" } },
        "overrides": [
          { "matcher": { "id": "byName", "options": "Total" },
            "properties": [{ "id": "color", "value": { "mode": "fixed", "fixedColor": "blue" } }] },
          { "matcher": { "id": "byName", "options": "Good" },
            "properties": [{ "id": "color", "value": { "mode": "fixed", "fixedColor": "green" } }] },
          { "matcher": { "id": "byName", "options": "Bad" },
            "properties": [{ "id": "color", "value": { "mode": "fixed", "fixedColor": "red" } }] }
        ]
      },
      "options": { "legend": { "displayMode": "list", "placement": "bottom" }, "tooltip": { "mode": "multi" } }
    }
  ]
}
Multiple OPC UA servers? These panels use the fleet-wide counts, which need no changes as servers are added or removed. To chart a specific server by name, add a panel with idako_collector_server_up{server="Your Server Name"}.
4

Set up email alerts

Three pieces, provisioned the same way as the dashboard: where to send email from, who receives it, and what conditions trigger it.

SMTP credentials — the one file you actually create yourself

Grafana needs real SMTP relay details to send anything, and that includes a password — which is exactly why it isn't part of the download. .env-example is the safe-to-share template already sitting in your folder; .env is the real file you make from it:

.env-example
# Copy this file to .env before starting the stack:
#   cp .env-example .env
# Then fill in your real SMTP relay details below. .env is gitignored and
# stays local to this machine only — never commit real credentials to Git.

# Required for Grafana's email alerts to actually send. Use your
# organization's own SMTP relay, or a transactional email provider
# (SendGrid, Mailgun, Amazon SES, etc.)
GF_SMTP_ENABLED=true
GF_SMTP_HOST=smtp.example.com:587
GF_SMTP_USER=alerts@example.com
GF_SMTP_PASSWORD=your-smtp-password
GF_SMTP_FROM_ADDRESS=alerts@example.com
GF_SMTP_FROM_NAME=Idako Monitoring
shell
cp .env-example .env
# then edit .env with a text editor and fill in your real values
.gitignore
.env
Changed .env after the stack is already running? A plain docker compose restart grafana is not enough — Grafana's container keeps whatever environment it was originally created with. Use docker compose up -d --force-recreate grafana to actually pick up new values.

Who receives the alerts

This file controls where alert emails go. The only change needed is the placeholder address:

grafana/provisioning/alerting/contactpoints.yaml
apiVersion: 1

contactPoints:
  - orgId: 1
    name: idako-email
    receivers:
      - uid: idako-email-receiver
        type: email
        settings:
          addresses: you@example.com
          singleEmail: true

Replace you@example.com with your real recipient — a comma-separated list works if more than one person should be notified.

Routing — send everything to that one address

This tells Grafana to route every alert to the contact point above — nothing to change here:

grafana/provisioning/alerting/policies.yaml
apiVersion: 1

policies:
  - orgId: 1
    receiver: idako-email
    group_by: ["alertname"]

What triggers an alert

Six conditions, one per subsystem plus two data-quality checks. Every rule queries Prometheus directly and routes through the contact point above via the default policy:

grafana/provisioning/alerting/rules.yaml
apiVersion: 1

groups:
  - orgId: 1
    name: idako-alerts
    folder: Idako
    interval: 1m
    rules:
      - uid: idako-instance-not-ok
        title: Idako instance is not OK
        condition: C
        for: 2m
        labels:
          severity: critical
        annotations:
          summary: "Idako instance is not reachable (Prometheus scrape of the /health endpoint is failing)"
        noDataState: Alerting
        execErrState: Alerting
        data:
          - refId: A
            relativeTimeRange: { from: 300, to: 0 }
            datasourceUid: prometheus
            model:
              expr: up{job="idako"}
              instant: true
              intervalMs: 1000
              maxDataPoints: 43200
              refId: A
          - refId: C
            datasourceUid: "__expr__"
            model:
              type: threshold
              expression: A
              conditions:
                - evaluator:
                    type: lt
                    params: [1]
              refId: C

      - uid: idako-buffer-not-ok
        title: Local Buffer is down
        condition: C
        for: 2m
        labels:
          severity: critical
        annotations:
          summary: "Idako's local buffer subsystem is not running (idako_buffer_up is 0)"
        noDataState: Alerting
        execErrState: Alerting
        data:
          - refId: A
            relativeTimeRange: { from: 300, to: 0 }
            datasourceUid: prometheus
            model:
              expr: idako_buffer_up
              instant: true
              intervalMs: 1000
              maxDataPoints: 43200
              refId: A
          - refId: C
            datasourceUid: "__expr__"
            model:
              type: threshold
              expression: A
              conditions:
                - evaluator:
                    type: lt
                    params: [1]
              refId: C

      - uid: idako-tsdb-not-ok
        title: TSDB is down
        condition: C
        for: 2m
        labels:
          severity: critical
        annotations:
          summary: "Idako's connection to the time-series database is not OK (idako_tsdb_up is 0)"
        noDataState: Alerting
        execErrState: Alerting
        data:
          - refId: A
            relativeTimeRange: { from: 300, to: 0 }
            datasourceUid: prometheus
            model:
              expr: idako_tsdb_up
              instant: true
              intervalMs: 1000
              maxDataPoints: 43200
              refId: A
          - refId: C
            datasourceUid: "__expr__"
            model:
              type: threshold
              expression: A
              conditions:
                - evaluator:
                    type: lt
                    params: [1]
              refId: C

      - uid: idako-server-disconnected
        title: OPC UA server disconnected
        condition: C
        for: 2m
        labels:
          severity: warning
        annotations:
          summary: "OPC UA server {{ $labels.server }} ({{ $labels.endpoint }}) is disconnected"
        noDataState: OK
        execErrState: Alerting
        data:
          - refId: A
            relativeTimeRange: { from: 300, to: 0 }
            datasourceUid: prometheus
            model:
              expr: idako_collector_server_up
              instant: true
              intervalMs: 1000
              maxDataPoints: 43200
              refId: A
          - refId: C
            datasourceUid: "__expr__"
            model:
              type: threshold
              expression: A
              conditions:
                - evaluator:
                    type: lt
                    params: [1]
              refId: C

      - uid: idako-bad-variables
        title: Bad variables detected
        condition: C
        for: 2m
        labels:
          severity: warning
        annotations:
          summary: "{{ $values.A }} variable(s) are reporting bad quality"
        noDataState: Alerting
        execErrState: Alerting
        data:
          - refId: A
            relativeTimeRange: { from: 300, to: 0 }
            datasourceUid: prometheus
            model:
              expr: idako_collector_bad_variables
              instant: true
              intervalMs: 1000
              maxDataPoints: 43200
              refId: A
          - refId: C
            datasourceUid: "__expr__"
            model:
              type: threshold
              expression: A
              conditions:
                - evaluator:
                    type: gt
                    params: [0]
              refId: C

      - uid: idako-forwarding-behind-collection
        title: TSDB forwarding is falling behind collection
        condition: D
        for: 5m
        labels:
          severity: warning
        annotations:
          summary: "Forwarding rate is more than 10% slower than the collection rate — the buffer backlog is likely growing"
        noDataState: OK
        execErrState: Alerting
        data:
          - refId: A
            relativeTimeRange: { from: 300, to: 0 }
            datasourceUid: prometheus
            model:
              expr: idako_collector_rate
              instant: true
              intervalMs: 1000
              maxDataPoints: 43200
              refId: A
          - refId: B
            relativeTimeRange: { from: 300, to: 0 }
            datasourceUid: prometheus
            model:
              expr: idako_tsdb_values_forwarded_rate
              instant: true
              intervalMs: 1000
              maxDataPoints: 43200
              refId: B
          - refId: C
            datasourceUid: "__expr__"
            model:
              type: math
              expression: "($A - $B) / $A"
              refId: C
          - refId: D
            datasourceUid: "__expr__"
            model:
              type: threshold
              expression: C
              conditions:
                - evaluator:
                    type: gt
                    params: [0.1]
              refId: D
RuleFires whenSeverity
Idako instance is not OKup{job="idako"} is 0 for 2mcritical
Local Buffer is downidako_buffer_up is 0 for 2mcritical
TSDB is downidako_tsdb_up is 0 for 2mcritical
OPC UA server disconnectedidako_collector_server_up is 0 for 2m — one alert per server, named in the emailwarning
Bad variables detectedidako_collector_bad_variables > 0 for 2mwarning
TSDB forwarding is falling behind collectionforwarding rate < 90% of collection rate for 5mwarning
Why up{job="idako"} and not a custom Idako metric? This is Prometheus's own, built-in signal for "could I reach this target at all" — it gets a fresh value on every single scrape attempt, success or failure, so it detects a fully unreachable instance within one scrape interval. A metric Idako itself produces (like idako_up) simply stops updating when Idako is unreachable, which is a much slower and less reliable way to notice a total outage.
Both firing and resolved notifications are sent — that's Grafana's default (a per-contact-point "Disable resolved message" option turns the second one off, if you'd rather only hear about new problems). Firing waits out the rule's for duration to avoid paging on a blip; resolved notifications go out on the next evaluation after the condition clears, no equivalent delay.
5

The Docker Compose file

docker-compose.yml wires everything together: Prometheus reads its config from step 2, Grafana reads its provisioning from steps 3–4 and its SMTP settings from .env, and both get a named volume so data survives a restart. Nothing to change here — it's already set up.

docker-compose.yml
services:
  prometheus:
    image: prom/prometheus:latest
    container_name: idako-prometheus
    restart: unless-stopped
    volumes:
      - ./prometheus/prometheus.yml:/etc/prometheus/prometheus.yml:ro
      - prometheus-data:/prometheus
    ports:
      - "9090:9090"

  grafana:
    image: grafana/grafana:latest
    container_name: idako-grafana
    restart: unless-stopped
    depends_on:
      - prometheus
    volumes:
      - ./grafana/provisioning:/etc/grafana/provisioning:ro
      - grafana-data:/var/lib/grafana
    ports:
      - "3000:3000"
    env_file:
      - .env

volumes:
  prometheus-data:
  grafana-data:
.env must exist before this will start. env_file: - .env means Docker Compose refuses to start the grafana service if that file is missing — make sure step 4's cp .env-example .env happened first.
6

Start the stack

From inside the idako-monitoring folder:

shell
docker compose up -d

Confirm both containers are running:

shell
docker compose ps

Then confirm Prometheus can actually reach Idako — open http://localhost:9090/targets in a browser. The idako target should show State: UP. If it shows DOWN, the error message next to it almost always names the problem — usually the host/port in step 2, or a firewall between the Docker host and Idako.

7

Open the dashboard

Go to http://localhost:3000 to sign in.

Default credentials: admin / admin. Grafana ships with this login out of the box and prompts you to set a real password the moment you sign in — do that immediately, especially if port 3000 is reachable from beyond your own machine.

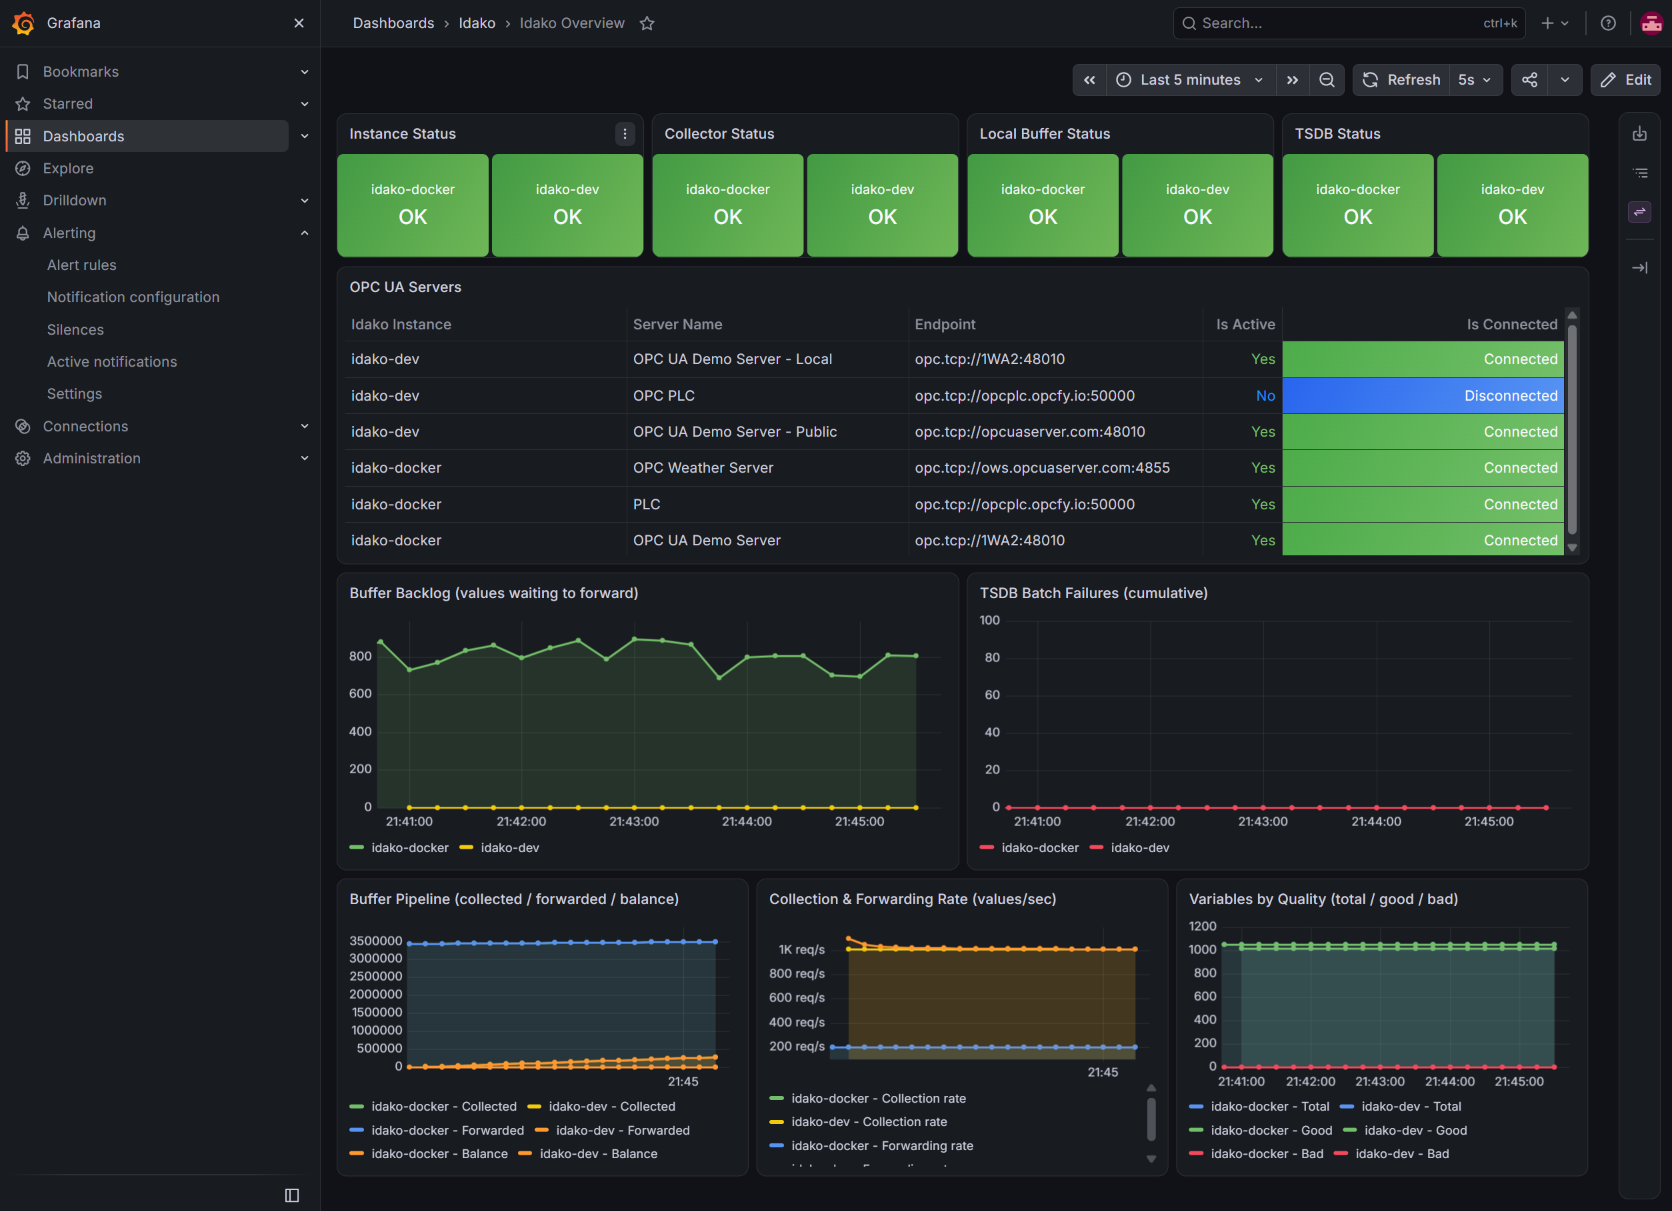
In the left menu, go to Dashboards — the Idako folder and the Idako Overview dashboard inside it were created automatically by the files from step 3. Open it — it should look like this:

The Idako Overview dashboard in Grafana: four green OK status tiles, a connected-server count, and six live charts showing buffer, tsdb, and variable-quality trends.
The Idako Overview dashboard, running against a healthy instance.
You should see green OK tiles for Instance, Collector, Local Buffer, and TSDB Status, a count of connected servers, and five live charts. If everything reads zero or empty, double-check the target is UP on the Prometheus targets page from step 6 first — an unreachable target is the most common cause.
Beyond one instance

Monitoring more than one Idako instance

Add one more entry to targets in prometheus/prometheus.yml — no changes needed anywhere else, including the dashboard and alert rules, since they already aggregate across whatever Prometheus is scraping:

prometheus/prometheus.yml (excerpt)
    static_configs:
      - targets:
          - "idako-host-1:4880"
          - "idako-host-2:4880"

Restart Prometheus to pick up the change: docker compose restart prometheus.

Before you trust it

Verifying the alerts actually work

A clean startup only proves Grafana accepted the SMTP settings, not that mail actually gets delivered. Two checks worth doing once, right after setup:

  • Send a test email — in Grafana, go to Alerting → Contact points, open idako-email, and use Test. This confirms your SMTP credentials and relay are correct in isolation, before any real alert depends on them.
  • Trigger a real one — stop Idako (or block the port) and wait a few minutes. "Idako instance is not OK" should reach Alerting → Active notifications within about 2–3 minutes, and land in your inbox shortly after. Bring Idako back and you should get a second, resolved email on the next evaluation.
SMTP authentication failing? The most common cause after a config change isn't a wrong password — it's a stale container. Confirm what's actually loaded with docker exec idako-grafana printenv | grep GF_SMTP and compare against your current .env; if they differ, that's the --force-recreate step from earlier being skipped, not a credentials problem.
Next steps

Where to go from here

More alert conditionsAdd another rule to the same rules.yaml group — e.g. a warning specifically for a growing idako_buffer_values_balance, before it turns into lost data.
Route by severityAdd a second contact point (e.g. a chat webhook) and a policy that matches on the severity: critical label already set on three of the six rules, so only the urgent ones page immediately.
Distinguish "down" from "metrics are broken"A blackbox_exporter container probing plain GET /health catches the narrower case where Idako is healthy but its Prometheus output specifically is malformed — up{job="idako"} alone can't tell those apart.
Keep history longer than Prometheus's defaultPrometheus's local storage is fine for weeks of data; for longer retention, point it at a remote-write target instead of changing anything on the Idako side.
See exactly what Idako reportsThe full field-by-field reference for /health, including every metric this dashboard and these alerts are built from.
This stack talks to Idako over plain HTTP on its health port — no credentials, no changes to Idako required. Everything here runs on infrastructure you control.

How to Implement a Unified Namespace: Plain MQTT or OPC UA

This article was created with AI assistance.

A Unified Namespace is usually built on plain MQTT. It doesn't have to be — and the alternative fixes several problems MQTT-based UNS projects run into once they scale past the pilot.

1Introduction to UNS

A Unified Namespace (UNS) is a single, live, hierarchical source of truth for operational data across a plant or enterprise. Instead of wiring point-to-point integrations between every PLC, SCADA system, MES, and cloud application, every system publishes into — and subscribes from — one shared namespace. It has become a foundational pattern in Industry 4.0 and Digital Transformation initiatives because it decouples data producers from data consumers: adding a new consumer means subscribing to existing data, not building yet another custom interface to yet another data source.

The typical implementation: MQTT broker + ISA-95 topic hierarchy

The most common way to build a UNS today is around an MQTT broker as the central nervous system. Devices, PLCs, and applications publish and subscribe to topics, and the broker fans messages out to whoever is listening. The topic tree is usually organized to mirror the ISA-95 equipment hierarchy — enterprise, site, area, production line, and work cell/asset — so a topic name alone tells you where in the physical plant a value came from, for example enterprise/site/area/line/cell/tagName.

PLAIN MQTT UNS Publishers PLC / SCADA MES / gateways (custom payload & topic per source) MQTT Broker Topic tree (ISA-95 style) enterprise / site / area line / cell / tagName no browse API, no history, no request/reply Subscribers Dashboards Historian bolt-on Cloud / analytics Everything a new subscriber needs to know about the topic tree — names, structure, payload shape — has to be documented and shared out of band, because MQTT itself has no way to browse or describe what's published.

A typical MQTT-based UNS: publishers push to a broker organized as an ISA-95 topic tree; subscribers read what they need — but nothing about the tree is discoverable from the protocol itself.

Pros and cons of MQTT-based UNS

Pros

  • Lightweight, simple pub/sub model with a low barrier to entry
  • Decouples publishers from consumers — add a subscriber without touching the source
  • Huge ecosystem: open-source brokers (Mosquitto, EMQX, HiveMQ), client libraries in every language, native support in most cloud IoT platforms
  • Works well over constrained or unreliable networks
  • Easy first step — a pilot UNS can be running in days

Cons

  • Payload format is not standardized. MQTT only moves bytes; every team invents its own JSON schema (Sparkplug B helps but is adopted inconsistently and is its own layer to agree on and maintain)
  • No access to historical data. The broker only knows the latest retained value — a historian has to be bolted on separately, with its own query interface
  • No feature for synchronous requests, including transactional calls — pub/sub has no built-in request/response, so writing back to a device or invoking an action needs an entirely separate mechanism
  • No support to browse the topic structure. Topics aren't self-describing; a new client has to already know the tree from external documentation, since MQTT has no discovery or introspection API
The question this raises Is it possible to build a UNS on a protocol other than MQTT — one that doesn't have these gaps?

2An Alternative: OPC UA as the Core Protocol

OPC UA is an IEC 62541 standard maintained by the OPC Foundation, built specifically to solve the problems above. Relevant to a UNS, it provides:

  • A browseable, discoverable address space — the information model is a hierarchy of objects, variables, and methods that any client can walk and inspect at runtime, no external documentation required
  • A well-defined payload format for published data, carrying value, quality, and both server and source timestamps as standard parts of every reading — not an ad-hoc JSON shape each team has to agree on
  • True report-by-exception, with server-side monitored items supporting both absolute and percent-based deadbands, so only meaningful changes go over the wire
  • Native support for both real-time and historical data through the same address space and the same client APIs
  • Built-in support for alarms and events, not a separate system bolted on afterward
  • A lighter footprint on the wire than it gets credit for: despite MQTT's "lightweight" reputation, MQTT/JSON payloads commonly run three times or more the size of the equivalent OPC UA binary-encoded payload for the same data

OPC UA also supports a Publish-Subscribe transport mode of its own — including over MQTT — so choosing OPC UA as the core protocol doesn't mean giving up MQTT transport where it's useful; it means the payload, the address space, and the semantics riding on top of it are finally standardized.

Implementing UNS with oBox Suite

oBox Suite from One-Way Automation is a modular platform for building exactly this kind of OPC UA-centric UNS. Its three main modules are:

  • Protocol Converter — south-bound connectivity to virtually any industrial data source: PLCs, RTUs, SCADA and DCS systems, CNC machines, and robots from mainstream and legacy vendors alike
  • Model Designer / Data Harmonizer — a WYSIWYG, web-based editor for building a hierarchical, ISA-95-aligned address space, turning raw tags into meaningful objects (for example, a Pump with Temperature and Pressure attributes) instead of a flat list of points
  • Data Logger — stores and forwards data, both real-time and historical, to downstream databases and messaging systems

That combination gives a UNS built on oBox Suite a few concrete advantages over a bare MQTT broker:

  • Southbound connectivity to virtually any industrial data source through the Protocol Converter module
  • A WYSIWYG, browser-based editor for the address space, with a real hierarchical structure — not a topic-naming convention enforced by hand
  • Support for a layered deployment: local site-level edge instances that push harmonized data up to a centralized cloud instance
  • Multiple, standards-based interfaces for higher-level applications to consume the same data:
    • OPC UA — real-time data via standard OPC UA subscriptions and monitored items; Pub/Sub over MQTT or brokerless UDP; and historical data, both raw and processed
    • REST API for lightweight application integration
    • MCP for straightforward integration with AI-based solutions
    • A built-in MQTT broker, so applications that only know how to subscribe over MQTT are still fully supported
OPC UA + OBOX SUITE UNS Field devices PLC / DCS / SCADA CNC / robots oBox Suite (edge) Protocol Converter Model Designer (harmonized) Data Logger Interfaces OPC UA subscribe OPC UA Pub/Sub (MQTT/UDP) Historical (raw / processed) REST API MCP (AI integration) Built-in MQTT broker Applications MES / analytics AI agents / cloud oBox Suite (cloud) centralized instance, multiple sites merged Site-level edge instances harmonize local data and push it up to a centralized cloud instance — the same browseable, standardized address space at every layer.

UNS built with OPC UA and oBox Suite: harmonized address space at the edge, layered up to a centralized cloud instance, exposed through OPC UA, REST, MCP, and MQTT.

3MQTT-Only vs. OPC UA + oBox Suite

DimensionPlain MQTT UNSOPC UA + oBox Suite
Payload format Not standardized — every team defines its own JSON schema Standardized OPC UA data value: value, quality, server and source timestamps
Historical data Not available from the protocol — a separate historian must be bolted on Native raw and processed historical access via the Data Logger module
Synchronous / transactional calls Not supported — pub/sub only, no request/response Supported via OPC UA services and method calls
Browsing / discovery of structure Not supported — topic tree must be documented and shared out of band Address space is browseable and self-describing by design
Report by exception Depends entirely on how each publisher is coded Built-in, with absolute and percent-based deadbands on monitored items
Alarms & events No native model — typically a separate system Native OPC UA alarms & events
Bandwidth efficiency JSON over MQTT — commonly 3x+ the size of the OPC UA binary equivalent Compact OPC UA binary encoding
Southbound connectivity to legacy/industrial sources Left to whatever publishes into the broker — usually custom, per source Protocol Converter module covers PLCs, RTUs, SCADA/DCS, CNC, robots out of the box
Building the address space / hierarchy Enforced only by topic-naming convention and discipline WYSIWYG Model Designer / Data Harmonizer, ISA-95-aligned
Edge-to-cloud layering Possible via broker bridging, configured and maintained by hand Built-in layered edge → cloud instance support
Integration interfaces MQTT only OPC UA (subscriptions, Pub/Sub over MQTT or UDP), REST API, MCP, plus a built-in MQTT broker
AI integration Custom, built by hand against the topic schema Native MCP interface

4Wrapping Up

Plain MQTT is a perfectly reasonable way to get a UNS pilot running quickly, and its ecosystem is hard to beat for raw reach. But the gaps that show up once a UNS moves past a pilot — no standard payload, no history, no synchronous calls, no browsing — aren't quirks of a particular broker; they're gaps in MQTT itself. OPC UA closes all four by design, and a platform like oBox Suite turns that into a practical UNS implementation: south-bound connectivity to the plant floor, a real hierarchical address space you build visually instead of by naming convention, and northbound access over OPC UA, REST, MCP, or MQTT — so applications that only speak MQTT still aren't left out.

References

  1. [1] OPC Foundation — OPC UA overview, address space, PubSub, and historical access: opcfoundation.org/about/opc-technologies/opc-ua/
  2. [2] One-Way Automation — oBox Suite: onewayautomation.com/obox-suite/

Idako vs. Telegraf: Two Ways to Log OPC UA Data to InfluxDB

This article was created with AI assistance.

Both can move process data from an OPC UA server into InfluxDB. They're built on very different assumptions about what else your pipeline needs to do — here's how to pick.

Telegraf is InfluxData's open-source metrics collection agent — a single Go binary with 300+ plugins covering everything from system metrics to databases, cloud APIs, message queues, and (via community-maintained plugins) OPC UA. Idako is a purpose-built OPC UA-to-database bridge: a much narrower tool that does one job — reading from OPC UA servers and getting that data into InfluxDB, SQL databases, or messaging platforms without losing samples along the way.

Neither is "better" in the abstract. Which one fits depends on what else is in your stack, who configures it, and how much you need OPC UA specifically — as opposed to metrics collection in general — to just work.

1The Short Version

Choose Idako if…

  • OPC UA is your primary or only data source
  • You want a GUI, not TOML files, for OT technicians to maintain — or SQL/REST access for automation
  • You need guaranteed store-and-forward buffering by default
  • Your servers expose complex/structured (ExtensionObject) data types
  • You want tags selected by scripted (Python) rules and mapped by template, not listed by hand one at a time
  • You need two-node HA for zero-downtime maintenance
  • You want a single vendor to call when something breaks

Choose Telegraf if…

  • You already run Telegraf for other metrics (hosts, containers, APIs)
  • You need one agent to also collect from dozens of non-OPC UA sources
  • Your team is comfortable in Go-ecosystem tooling and config-as-code
  • Budget requires a fully open-source, license-free tool at any scale
  • Your OPC UA tags are simple scalar types (no ExtensionObjects)

2What Each Tool Actually Is

Telegraf

Telegraf is part of InfluxData's TICK stack — the same company that makes InfluxDB. It's a general-purpose, plugin-based collection agent configured with TOML files. For OPC UA specifically, it ships two separate input plugins: opcua, which polls a configured list of nodes on a fixed interval, and opcua_listener, which opens a true OPC UA subscription and streams changes as the server reports them [1]. Output goes through the influxdb_v2 (or influxdb for 1.x) plugin, one of roughly 100 supported outputs.

Idako

Idako (formerly ogamma Visual Logger for OPC) is built around a single job: bridge OPC UA servers to storage and messaging targets — InfluxDB, TimescaleDB, MS SQL/MySQL/PostgreSQL, Kafka/Confluent/Redpanda, MQTT, Snowflake — with native OPC UA subscriptions, millisecond (microsecond with InfluxDB) timestamp resolution, and Store & Forward buffering as a first-class, on-by-default feature rather than an add-on. Its own configuration lives in a SQL database (SQLite for single-node installs, PostgreSQL for larger or clustered deployments) rather than a flat file — so you can change it from the GUI, by editing the database directly, or programmatically through a REST API, whichever fits your ops workflow.

3Architecture, Side by Side

IDAKO PATH OPC UA PLC / DCS / SCADA Idako Native subscribe + buffer Forward (Store & Forward on) InfluxDB TELEGRAF PATH OPC UA PLC / DCS / SCADA Telegraf opcua / opcua_listener input influxdb_v2 output (+ 99 others) InfluxDB Buffering on by default, disk-backed In-memory by default; disk mode is opt-in

Both draw the same box diagram at a glance. The difference is in the boxes: Idako's collector and forwarder are one purpose-built component; Telegraf assembles the same pipeline out of two independently-maintained, general-purpose plugins that happen to be able to talk to each other.

4Head-to-Head

DimensionIdakoTelegraf
OPC UA subscriptions Native from the start — event-driven with per-tag deadbanding Supported via opcua_listener (added in Telegraf v1.25) [1], separate from the older polling-only opcua plugin
Complex / structured data types Full support for vendor-specific structured types (custom binary decoding) Reading OPC UA ExtensionObjects is a known open limitation — errors out on many structured-type nodes [2]
Store & Forward buffering On by default, disk-backed, sized for your outage window out of the box In-memory buffer by default (metric_buffer_limit); a disk-backed WAL buffer exists but is still flagged experimental, with manual disk-space management and reported edge-case bugs [3]
Configuration storage & access Held in a SQL database (SQLite or PostgreSQL) — edit via GUI, direct SQL, or REST API Flat TOML config file, hand-edited or templated by external config management
Variable selection Manual pick in the GUI, or Python-scripted selection rules (e.g. "log everything under this folder matching X") run from the GUI on demand Listed explicitly, node by node, in the TOML config file
Measurement / tag mapping Set per variable individually, or generated automatically from templates so hundreds of similar tags map consistently without per-tag editing Set per node block in TOML; no built-in templating engine — bulk/consistent mapping across many tags is typically scripted outside Telegraf
High availability Native 2-node HA cluster — automatic failover and maintenance (e.g. upgrades) without a collection gap No built-in HA; redundancy means running independent agents and deduplicating downstream, or leaning on external orchestration (systemd/Kubernetes restarts)
Output destinations Curated set: InfluxDB, TimescaleDB, SQL databases, Kafka/Confluent/Redpanda, MQTT, Snowflake ~100 output plugins — InfluxDB is one of many, alongside Prometheus, Kafka, cloud monitoring services, and more
Non-OPC UA data sources Out of scope by design 200+ input plugins for hosts, containers, databases, cloud APIs, and other industrial protocols
Licensing / cost Community Edition free forever (≤64 tags); paid Standard Edition beyond that Fully open source (MIT), free at any scale
Support model Vendor support from One-Way Automation Community forums / GitHub issues, or a paid InfluxData support contract
Deployment Windows, Linux, Raspberry Pi, Docker; optional 2-node HA cluster Windows, Linux, macOS, Raspberry Pi, Docker — very portable single binary

5Where Telegraf Genuinely Wins

If OPC UA is just one of several things you're collecting — say, host metrics from your edge servers, container stats, and API health checks alongside process data — running one Telegraf agent for all of it is simpler than running Idako plus a separate metrics agent. Telegraf's plugin ecosystem is enormous, it's free without a tag-count ceiling, and if your OPC UA tags are all simple scalar types, both its polling and subscription-based inputs work well. It's also the natural choice if your team already standardizes on InfluxData tooling (Telegraf, InfluxDB, Chronograf/Grafana) and is comfortable maintaining TOML configs as code.

6Where Idako Genuinely Wins

When OPC UA reliability is the project — not a side input among many — the gaps close in Idako's favor. Store & Forward isn't something you have to opt into and tune around known bugs; it's the default behavior. Structured/ExtensionObject tags, common on DCS systems and vendor-specific PLC blocks, are handled natively instead of erroring out. And a GUI-driven config means the OT technician who owns the PLC, not necessarily the person who knows TOML syntax, can maintain the tag list. For a plant where OPC UA-to-historian is the whole job, that focus tends to matter more than plugin count.

A few differences matter specifically once you're managing more than a handful of tags:

  • Config lives in a real database, not a text file. Idako's own configuration is stored in SQLite or PostgreSQL rather than a flat TOML file, so a change can come from the GUI, a direct SQL statement, or a REST API call — useful if you want another system (a provisioning tool, an MES) to manage tags programmatically instead of hand-editing config.
  • Selection logic, not a hand-built list. Instead of listing every node by hand, Idako lets you define selection rules in Python — e.g. "log every variable under this folder whose name matches this pattern" — and run that selection from the GUI to (re)populate the tag list in one step, instead of adding nodes one at a time.
  • Mapping scales with templates. You can map OPC UA attributes to InfluxDB measurements and tags one variable at a time, or define a template once and apply it across hundreds of structurally similar tags — consistent naming without hand-editing each one.
  • Built-in 2-node HA. Idako supports deployment as a high-availability cluster across two nodes, so a node failure or a planned upgrade doesn't create a collection gap — maintenance becomes a non-event instead of a scheduled outage window.
Not mutually exclusive These tools coexist well. A common pattern: use Idako to pull OPC UA data reliably — especially anything with structured types or strict no-data-loss requirements — into InfluxDB or Kafka, and run Telegraf alongside it to collect infrastructure and application metrics from the same edge gateway into the same InfluxDB instance. You get purpose-built OPC UA handling without giving up Telegraf's broader collection footprint.

7Wrapping Up

Telegraf is the right tool when OPC UA is one data source among many and you want one open-source agent to rule them all. Idako is the right tool when OPC UA is the core of the job and you can't afford the pipeline to quietly drop a structured tag or lose an hour of data during a network blip. Most plants end up choosing based on which failure mode they're more worried about: missing a plugin, or missing data.

References

  1. [1] InfluxData, "Yes, You Subscribed Correctly. The OPC UA Client Listener Plugin Has Been Released!" — influxdata.com/blog/opc-ua-client-listener-plugin/; Telegraf opcua_listener and opcua input plugin docs — docs.influxdata.com/telegraf/v1/input-plugins/
  2. [2] Telegraf GitHub issue #9911, "OPC-UA Client: Support for ExtensionObjects" — github.com/influxdata/telegraf/issues/9911
  3. [3] Telegraf output buffer strategy spec (tsd-005) and related disk-buffer issues (#15876, #15868, #16500, #16670, #18085) — github.com/influxdata/telegraf

MQTT vs OPC UA myths and delusions

You can see a repetition of the same myths and delusions that have been circulating on the internet for quite a while now. Here are some of them:

1. "When you use OPC UA, it is always point-to-point connections."

In fact, very often you will see OPC UA clients connecting to a gateway or aggregator like Kepware KEPServerEX or Prosys OPC Forge. Even in the "Decoupled Architecture" diagram presented by Kudzai, you can see an aggregator—Node-RED—being used.

2. "OPC UA is request-response based and synchronous, while MQTT is publish-subscribe and event-driven/asynchronous."

In fact, OPC UA clients very rarely use the Read service call to get real-time data. Instead, they use the Subscriptions and Monitored Items mechanism, which in many cases delivers data once it changes—and often within a much shorter time than MQTT brokers would. Note that this is a separate mechanism from OPC UA Pub/Sub (e.g., over MQTT/UDP), which can be considered equivalent to standard MQTT.

3. "When you use MQTT as a transport, data is published only when it changes (Report by Exception / RbE)."

In fact, MQTT itself has nothing to do with RbE; it does nothing to prevent publishers from repeatedly sending identical messages. In contrast, RbE is a core, built-in requirement for OPC UA. Furthermore, OPC UA allows you to explicitly define what a "value change" means using the deadbands feature. In other words, you can configure the server to trigger a change event only when the value fluctuates beyond a specific absolute value or percentage.

4. "MQTT overhead is minimal, while the OPC UA binary protocol is heavier."

In fact, the opposite is true. The OPC UA binary protocol is roughly three times lighter on the wire than vanilla MQTT.

5. "OPC UA might be good to use at the OT level, but when you move data to the cloud, MQTT is the only suitable option because OPC UA requires opening incoming ports into the OT network."

In fact, OPC UA features a "reverse connection" capability. This allows clients located in the cloud to access data from OPC UA servers located inside the OT network using only outgoing connections from the OT network—exactly how it is done with MQTT. If your specific OPC UA server or client doesn't natively support this feature, you can easily implement it using aggregating proxies like Prosys OPC Forge.

About OPC UA timestamps

As software engineers and manufacturing industry professionals, it is important to understand the use of timestamps. This article explains the basics of what timestamps are, the features it boasts, and a possible solution to any associated headaches.

What is a Timestamp?

A timestamp is a way of recording the date and time of each data point or event in a data acquisition system. Having correct timestamps in process control data acquisition is essential for ensuring the validity, reliability, and usability of the data. It also helps to enable effective process monitoring, control, and optimization.

Precise timestamps ensure accurate analysis and interpretation of the data. This is especially crucial because it aids in the identification of trends, patterns, anomalies, and correlations. Timestamps also facilitate synchronization and integration of data from multiple sources. This includes different sensors, instruments, devices, or systems.

Types of Timestamps:

According to the OPC UA Standard, each value of an OPC UA variable is associated with 2 timestamps: Source and Server timestamps.

  • The Source Timestamp is used to reflect the timestamp that was applied to a variable value by the data source. This indicates the time at which data values were measured at the lowest-level data source. It’s important to consider that this data source can be located in the same machine that runs the OPC UA Server, or it can be in a different device with its own system clock.
  • The Server Timestamp is used to reflect the time that the Server received a variable value or deemed it as accurate.

If the server reads data values itself, then the source and server timestamps will usually be the same. If an OPC UA Server gets data from another device that supports timestamps, then the source timestamp can be significantly different than the server timestamp.

Time Zones: A Mystery

No matter the situation, system clocks in devices that are a part of the data acquisition path should be in sync. Ideally, system clocks should be synchronized with time servers, such as an NTP protocol.

To avoid confusion and errors during conversions, all timestamps in OPC UA are UTC timestamps. Interestingly, this means that there are no time zones or daylight savings. To offset this, timestamp values are usually converted to the user's local time by the application displaying them.

When an OPC UA client creates a subscription with monitored items, the device can define which timestamps it needs to receive. This can be a source or server timestamp, and sometimes even both.

The Solution:

Our bestselling product Idako: Industrial Data Collector, creates subscriptions and monitored items that request both timestamps. This allows you to have the choice of freedom between different timestamp formats. In addition, Idako is scalable, energy efficient, and robust when handling an unlimited number of tags.  When data values are forwarded to the destination time-series database or MQTT broker, the format of timestamps depends on the destination database type.

Different Scenarios, Depending on the Destination Database:

  • When the destination is an SQL database or Snowflake, the source timestamp is written in a "time" column of the values table. If the source timestamp is not defined, then a server timestamp is used. It is also possible to write a client timestamp in the column "client_time". The “client_time” is the time when data values were received by the Idako from the OPC UA Server. This timestamp is especially useful when the server or source timestamps are unreliable and not accurate enough.
  • When the destination is InfluxDB, Confluent, or Apache Kafka, then the source timestamp is used as a record timestamp. If the payload is composed using a template, then all three timestamps can be included in the payload using placeholders like "[SourceTimestamp]", "[ServerTimestamp]", and/ or "[ClientTimestamp]".
  • When the destination is an MQTT broker, timestamps cannot be a part of the published messages. This is because the MQTT protocol does not exactly specify how timestamps should be transported from the publisher to the broker. So, they can be only included in the payload. In this case, the payload should be defined using a template, with placeholders for timestamps like: "[SourceTimestamp]", "[ServerTimestamp]", and/ or "[ClientTimestamp]".

Duplicate Records and High-Resolution:

In some cases, duplicate records (with the same value and timestamp for the same variable) can be written on the database. This can occur when Idako disconnects from the server and reconnects, or when it restarts. In these cases, a variable data value can be the same, and the source timestamp can also be the same as before it was reconnected. This might cause duplicate record errors in SQL databases if the values table is configured to have a unique index by “source_id” and time column values. To resolve this issue, our product Idako has configuration settings that allow duplicate records (refer to our User Manual for details).

Furthermore, OPC UA allows the definition of timestamps with high resolution: down to a 10 picosecond precision. Other target databases usually do not support such high resolutions, so this is a very impressive feature. The Idako configures the precision with which timestamps are written. This can be seconds, milliseconds, or microseconds. Different storage destinations have different ways to represent timestamps.

Our product Idako is a master in fine-tuning the timestamp format. This can occur in the following ways:

  • An integer number representing a Unix epoch time (depending on the number of seconds, milliseconds, or microseconds precision since Jan. 1st, 1970).
  • A string value formatted with the ISO-8601 standard
  • An OPC UA DateTime value (which is an integer number of 100 nanosecond intervals passed since Jan. 1st, 1601).

If you enjoyed learning more about timestamps and its uses, feel free to comment and ask questions. If you’re interested in finding out more about the Idako, email us at sales@onewayautomation.com to begin the purchase process.